There’s a careful process you need to follow when removing Wallpaper to ensure your walls stay intact and undamaged. In Winnipeg’s unique climate, taking the right steps with tools like scrapers, liquid strippers, or steamers will help you avoid common pitfalls such as plaster damage or adhesive residue. By preparing correctly and using proven methods, you can create a smooth surface ready for painting or new Wallpaper. Let Lakeside Painters guide you through effective ways to strip your Wallpaper safely while protecting your home’s interior.
Most homeowners in Winnipeg find wallpaper removal a challenging task that, if not done properly, can cause damage to their walls. You need to approach the process with patience and the right techniques, like scoring, using a liquid wallpaper stripper, or a wallpaper steamer to loosen adhesive without harming plaster. Protecting your surfaces and wearing proper safety gear will make the job safer and more efficient. By following these expert steps, you can achieve a smooth, clean surface ready for repainting or redecorating, preserving the integrity of your Winnipeg home’s walls.
Removal of Wallpaper in your Winnipeg home can be a challenging task, but with the right techniques, you can protect your walls from damage. Using appropriate tools like scrapers and liquid strippers helps remove Wallpaper smoothly, while avoiding harsh methods such as oversteaming that can harm plaster. You’ll also learn how to address leftover adhesive and minor wall imperfections to prepare your surface for a fresh new look. At Lakeside Painters, we guide you through safe and effective steps so your walls stay intact and ready for painting or re-wallpapering.
Key Takeaways:
- Test the wallpaper adhesion first by gently pulling a corner; if it comes off easily, use scraping tools and a liquid wallpaper stripper to avoid damaging the wall surface.
- If the Wallpaper is stubborn or difficult to remove, consider using a wallpaper steamer to soften the adhesive, but take care to avoid over-steaming, which can harm plaster walls.
- After removing Wallpaper, address any leftover residue, flaky paint, or damaged plaster by sanding, filling, and priming to create a smooth surface ready for repainting or new Wallpaper.
For professional wallpaper removal and preparation services in Winnipeg, visit Lakeside Painters to ensure your walls are treated with care and expertise.
Decoding Your Wallpaper’s Adhesion
Assessing the Wallpaper’s Condition
Pull back a corner of your Wallpaper to gauge how firmly it clings. If large sections peel away smoothly without damaging the underlying plaster, the Wallpaper is likely strippable with standard tools and liquid stripper. Conversely, fragments that resist pulling or crumble easily signal a tougher removal ahead, potentially involving steam or heavier-duty methods. The age of the Wallpaper and the type used—whether vinyl-coated, flocked, or traditional paper—also impact how it responds during removal. Spotting these clues early saves you time and helps protect your wall’s surface in Winnipeg’s often fluctuating humidity conditions.
Choosing the Right Tools for Removal
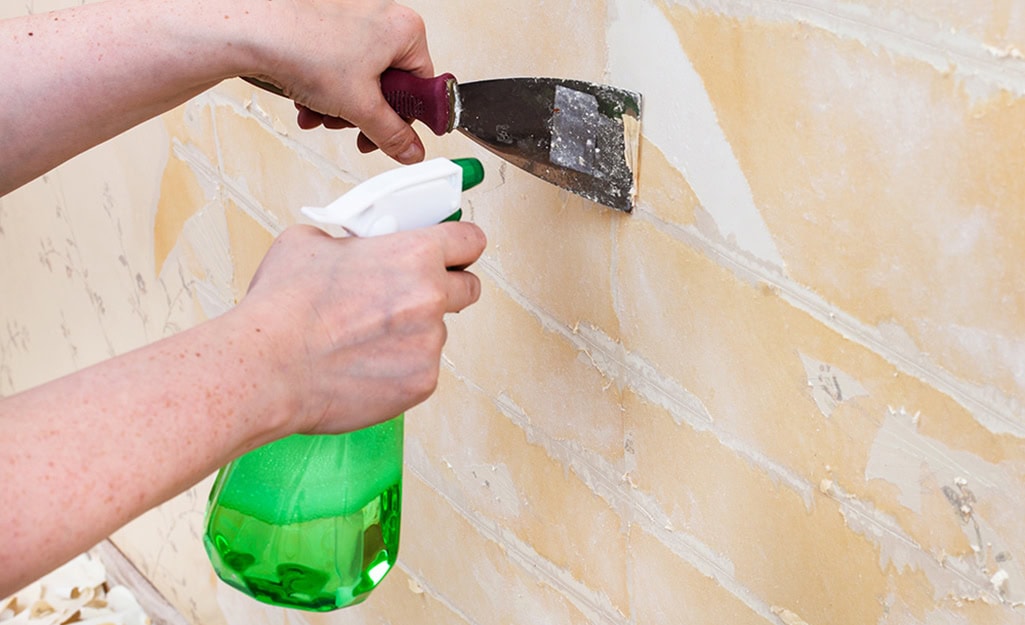
Selecting your tools depends on the Wallpaper’s stubbornness and the room’s layout. A sharp, flexible scraper is a must-have for broad wall areas, along with a scoring tool to pierce thick or coated wallpapers gently. For tight spots, like behind radiators or around moldings, a long-handled or angled scraper provides better access. Tackling tough glue or painted-over wallpapers often requires a liquid stripper spray or a wallpaper steamer, offering steam penetration to soften adhesives without aggressive scraping. Gloves, protective eyewear, and a mask should accompany your toolkit for safety.
Diving deeper, a Paper Tiger scoring tool offers a controlled way to create shallow perforations without risking plaster damage—ideal if your plaster walls in Winnipeg are delicate or old. A liquid stripper like Zinsser DIF can speed up removal by chemically loosening adhesives, especially under multiple wallpaper layers. When heavy-duty steamers enter the picture, they release hot moisture that weakens paste bonds quickly, but oversteaming risks loosening or cracking plaster, so careful timing and wall monitoring are key. Having a variety of scrapers in sizes and shapes lets you adapt as you encounter varying adhesion levels and wall contours, ensuring a thorough yet gentle process that leaves your surfaces ready for repainting or fresh wallpaper installation.
| Wallpaper Type | Adhesion Characteristics |
| Traditional Paper | Generally easy to remove; peels in large sheets |
| Vinyl-Coated | Highly adhesive; often requires scoring and chemicals |
| Fabric-Backed | Heavy, resistant; steady steaming preferred |
| Foil Wallpaper | Very durable; may need prolonged steaming and gentle scraping |
| Painted Over Wallpaper | Can bond layers tightly; may require multiple methods |
Additional insight into wallpaper types reveals that vinyl and fabric-backed wallpapers tend to resist conventional scraping due to their tough surfaces and strong adhesives. Scoring tools like the Paper Tiger can assist in penetrating these surfaces without harming the plaster beneath, allowing chemical strippers to soak in. Conversely, traditional paper varieties frequently lift with minimal effort after applying a liquid stripper. Swollen plaster or painted layers beneath the Wallpaper can complicate removal, demanding patience and a combination of steaming, scraping, and chemical treatment. After proper identification, your removal strategy will be more effective and less damaging to Winnipeg’s home walls.
- Peeling a corner reveals the adhesion level.
- Wallpaper type dictates the removal method.
- Use scoring tools for dense surfaces.
- Vinyl and foil need gentler chemical or steam approaches
- After careful assessment, choose the safest and most efficient technique
Chemical Solutions: The Power of Liquid Strippers
Scoring the Wallpaper Effectively
Lightly scoring your Wallpaper allows the liquid stripper to seep through and break down the adhesive beneath. Using the corner of a wallpaper scraper or a Stanley knife, make shallow rows or perforations across the surface without cutting into the plaster underneath. If your confidence in doing this manually is low, investing in a Paper Tiger can quickly create controlled perforations with minimal risk of wall damage, letting the stripper penetrate evenly and making removal far easier.
Applying and Using Chemical Strippers Safely
Wearing protective gloves, glasses, and a DIY respiratory mask shields you as you apply the chemical stripper with a large sponge or spray bottle to ensure even coverage. Follow the manufacturer’s instructions for dwell time, but avoid oversaturating the wall to protect your floor and plaster. Have clothes ready to catch any drips, and work in a well-ventilated space to minimize inhaling fumes from potent stripping agents like Zinsser DIF.
Handling chemical strippers involves respecting their strength. These products contain active ingredients designed to weaken wallpaper glue, but the vapors can irritate your skin, eyes, and respiratory system if you’re not careful. Combining personal protective equipment with proper ventilation prevents common hazards such as dizziness or skin burns. Also, avoid applying stripper near electrical outlets or switches to reduce the risk of short circuits. With preparation and caution, you’ll harness the chemical power effectively without compromising your safety or the condition of your walls.
Essential Tools for Safe Wallpaper Removal
Must-Have Hand Tools for the Job
Your basic set begins with a reliable wallpaper scraper like the Harris stripper, perfect for tackling most surfaces without gouging the plaster. For tight spots behind radiators or intricate moldings, a long-handled scraper delivers better leverage and access. Adding a Paper Tiger scoring tool can save a lot of time, scoring Wallpaper gently to allow chemical strippers to penetrate without damaging walls. A sturdy plastic spray bottle or large sponge helps apply liquid stripper evenly, while a sharp Stanley knife can assist in carefully scoring or lifting stubborn edges. These tools form the backbone of smooth, damage-free wallpaper removal.
Protective Gear to Prevent Injury
Gloves, eye protection, and a respiratory mask are your frontline defense. When working with chemical strippers or steamers, protecting your skin and lungs from harsh fumes and hot steam is non-negotiable. Durable gloves shield your hands from irritants and prevent cuts from scraping tools, while goggles keep airborne particles and splashes away from your eyes. A DIY-grade respirator filters out fumes, mitigating risks from prolonged exposure to stripping agents, especially important in poorly ventilated Winnipeg homes during colder months.
Protective gear elevates your safety beyond basic precautions; for instance, thick nitrile gloves can resist chemical burns and abrasions better than latex, giving you confidence as you work. Wrap-around safety glasses provide wider coverage to block dust or splatter coming from multiple angles. Respiratory masks rated for organic vapors are recommended if you’re using commercial liquid strippers indoors. Investing in quality personal protective equipment helps avoid common DIY injuries, allowing you to focus fully on achieving that pristine wall finish.
Essential Tools for Wallpaper Removal
Must-Have Scraper Tools for Effective Removal
Your first line of defense against stubborn Wallpaper is a quality scraper. The Harris wallpaper stripper, popular among Winnipeg DIYers, allows you to get underneath the paper without gouging plaster. For tight spots behind radiators or corners, a long-handled scraper extends your reach and provides better leverage, reducing strain on your hands. Choose scrapers with comfortable grips and strong, flexible blades that hold up after repeated use. These tools let you peel off large sections cleanly, saving time and preventing unnecessary damage to your walls.
Innovative Gadgets: The Paper Tiger vs. Traditional Methods
Scoring Wallpaper before applying stripper is a key step, and the Paper Tiger is a game-changer compared to manual scoring with knives or scrapers. Its multiple wheels create uniform perforations deep enough for liquid to penetrate, yet shallow enough to protect your plaster underneath. It speeds up prep work dramatically while eliminating the risk of accidental cuts that can occur with traditional methods. Although it carries a higher upfront cost, many Winnipeg homeowners find the investment worthwhile for the precision and efficiency it delivers.
Beyond saving time, the Paper Tiger’s design reduces the frustration of uneven scoring, which often leads to patchy stripping and extra sanding afterward. Traditional scoring tools require a steady hand and patience, whereas the Paper Tiger’s rolling action ensures consistent results across entire walls or ceilings. This uniform penetration speeds up the wallpaper stripper’s effectiveness, helping you remove even tough, multi-layered papers without excessive force or damage.
Embracing the Steam: How to Use a Wallpaper Steamer
When to Opt for Steam Over Chemicals
If your Wallpaper resists peeling after testing with chemical strippers or you’re facing a large surface covered with stubborn layers, steam provides a powerful alternative. Steamers work especially well on older wallpaper types or vinyl-backed paper that chemicals struggle to penetrate. In Winnipeg’s historic homes, where multiple wallpaper layers often accumulate, a wallpaper steamer can save you hours by loosening adhesive faster than liquid solutions could.
Techniques for Steaming Without Damage
Press the steam pad gently but firmly against the Wallpaper to allow hot moisture to penetrate without over-saturating the plaster underneath. Hold the steamer in place for about 20 to 30 seconds before sliding your scraper under softened sections. Take breaks often to avoid overheating the wall or your equipment, and always keep the steamer moving to reduce the risk of plaster damage caused by excess moisture.
Applying steam demands a balance between enough heat to loosen adhesives and care to protect the wall. Focusing on small sections at a time limits water absorption, reducing the chance of plaster softening or crumbling. If you notice paint bubbling or plaster swelling, pause immediately and allow the walls to dry out before continuing. Wearing gloves and eye protection guards against hot steam exposure, and using a steamer rated for household use — such as models available for about £40 on Amazon UK — ensures manageable heat output suitable for delicate tasks. Proper ventilation also helps dissipate moisture buildup, preventing mold or mildew from growing.
Effective Techniques for Removing Wallpaper
The Art of Scoring Wallpaper
Scoring your Wallpaper creates tiny perforations that allow stripping solutions to penetrate effectively. Using a wallpaper scraper’s corner or a Stanley knife, you can make shallow, light indentations—just enough to break the surface without cutting into the plaster. In Winnipeg homes with older walls, this subtle scoring prevents damage while speeding up the soaking process. For added safety and efficiency, specialized tools like the Paper Tiger can score large areas quickly without harming your plaster, ensuring a cleaner removal experience.
Utilizing Liquid Strippers Correctly
Applying a concentrated liquid stripper like Zinsser DIF after scoring softens both the paper and adhesive, making removal easier. Using a sponge or plastic spray bottle gives you control over even coverage, helping the chemical penetrate stubborn areas without over-wetting the wall. Protective gear such as gloves, glasses, and a mask is vital to handle the chemicals safely during application.
To maximize results with liquid strippers, apply the solution in sections, allowing the manufacturer’s recommended dwell time to work. You might notice Wallpaper bubbling or lifting after 15 to 30 minutes, indicating effective penetration. At this point, use a sharp scraper to gently lift the edges and peel away paper in large strips, reducing wall damage. Avoid rushing the process—patience with liquid strippers pays off in cleaner, smoother walls ready for your next step.
Leveraging Wallpaper Steamers for Stubborn Paper
If your Wallpaper refuses to budge, a wallpaper steamer becomes a valuable ally. By pressing the steam pad against the surface, hot moisture softens the glue, allowing you to glide a stripping knife under the paper. This method works especially well on older, multiple-layered wallpapers common in Winnipeg’s older homes, where thick adhesive layers resist chemical strippers.
Operating a steamer requires careful pacing since overexposure to steam risks loosening or crumbling plaster beneath. Keep the steam moving in sections, and use protective gloves and eyewear to shield yourself from the intense heat. A budget-friendly steamer—priced around £40 in the UK market—offers strong performance for DIY projects. Still, you can also rent or borrow models locally, tailoring usage to the scale of your job and avoiding unnecessary wall damage.
Mastering the Liquid Wallpaper Stripper
How to Prepare Walls for Chemical Strippers
Lightly scoring your Wallpaper is key to letting the chemical stripper penetrate effectively. Use the corner of a wallpaper scraper or a Stanley knife to create subtle indentations without cutting into the plaster underneath. If you’re concerned about damaging your walls, a tool like a Paper Tiger can score the Wallpaper evenly with no risk. Make sure the surface is dust-free and dry before applying any liquids, and protect your floors and surrounding areas with drop cloths or plastic sheeting to catch drips from the chemical stripper.
Applying the Stripper: Techniques for Best Results
Pour your liquid stripper into a spray bottle or use a large sponge to distribute it evenly across the scored Wallpaper. Avoid soaking the wall too heavily, as excessive moisture can damage plaster, especially on older Winnipeg homes with delicate walls. Apply the stripper section by section, working in manageable 2-3 square foot areas. Wait the recommended time—usually 15 to 30 minutes—before using a scraper to gently lift loosened paper. Repeat application on stubborn patches, ensuring you wear protective gloves, glasses, and a mask to guard against chemical fumes.
Applying the liquid stripper methodically ensures the best balance between effectiveness and wall preservation. Target smaller wall sections at a time rather than saturating large areas, giving the stripper time to loosen adhesive bonds without overexposing the plaster. Using a spray bottle allows for even coverage and better control, reducing waste and minimizing drips. When scraping, angle your tool gently to prevent gouging, especially near textured plaster, common in Winnipeg’s older houses. Following the manufacturer’s timings closely prevents plaster overexposure; this approach not only saves effort but preserves your walls for a smooth repaint or new wallpaper installation.
Addressing Common Wall Issues Post-Removal
Handling Flaky Paint and Adhesive Residues
Flaky paint patches often reveal themselves after wallpaper removal, especially if multiple paint layers were present initially. Use a wallpaper scraper to carefully chip away loose paint flakes, then smooth edges with a hand sander or sandpaper. For uneven surfaces left behind, applying Polycell Finishing Skim with a paintbrush raises the low areas to match the surrounding wall height once dry, sanding back the compound results in a level, smooth finish that prevents any unsightly marks showing through your new paint or Wallpaper.
Repairing Damaged Plaster for a Smooth Finish
Deeper holes or gouges in your plaster demand a different approach. Smaller patches respond well to Polycell Pollyfiller, while larger damaged areas require Polycell Plaster Repair. After removing loose material, press the lightweight filler firmly into the damaged spots with the supplied spatula. Let it dry thoroughly, then sand the surface flat to integrate seamlessly with the surrounding wall, preparing it perfectly for your next step in redecorating.
In cases of extensive plaster damage, layering the filler in two or more applications may be necessary to build up the surface evenly. Take care to sand between layers for the best adhesion and a uniform finish. Using a fine-grit sanding block helps avoid scratching the repaired area. For a flawless result in Winnipeg homes, paying attention to these repair details ensures your walls look professional and wear well over time.
Harnessing the Power of Steam
When to Choose a Wallpaper Steamer
If your Wallpaper clings stubbornly to the wall despite attempts with scrapers or chemical strippers, a wallpaper steamer often becomes the tool of choice. It excels with thick, multiple-layered Wallpaper or in cases where previous treatments have made the paper nearly impossible to remove by hand. Since steam penetrates layers gently with hot moisture, it loosens adhesive bonds without excessive scraping. For Winnipeg homes facing cold, dry climates where old adhesives tend to harden, a steamer can reduce hours of labor and minimize damage to the plaster beneath.
Step-by-Step Guide to Safe and Effective Use
Operating a wallpaper steamer effectively involves methodically applying steam to sections of the wall, allowing it to soak long enough to soften the paste, then using a stripping knife to lift the paper away. You want to work in manageable 12-18 inch squares, pressing the steam plate firmly against the surface for about 30 seconds before attempting removal. Ensure adequate ventilation throughout the room, wear protective gloves, and avoid overexposure to steam, which can cause plaster to weaken or bubble. Using the right pace and pressure helps preserve your wall’s integrity and speeds up cleanup.
Step-by-Step Guide to Safe and Effective Use
| Step | Details |
|---|---|
| 1. Prepare Your Space | Clear furniture away and protect floors with drop cloths. Plug in the steamer and fill its water tank according to the manufacturer’s instructions. |
| 2. Heat the Steamer | Allow 10–15 minutes for the unit to reach full steam temperature before use. |
| 3. Press the Steam Plate on the Wallpaper | Select a 12-18 inch section. Hold the steam pad flush against the wall for approximately 30 seconds to saturate the Wallpaper and adhesive. |
| 4. Use a Stripping Knife | Carefully slide your stripping knife under the loosened paper’s edge. Gently peel it away, applying more steam if resistance persists. |
| 5. Clean Residue and Inspect | Once the Wallpaper is removed, wipe down the wall and check for any leftover adhesive or damage. |
| 6. MaintaiSafetyty | Wear protective gloves and eye protection to shield yourself from hot steam. Ensure room ventilation to avoid excess humidity buildup. |
The key to using a wallpaper steamer safely lies in balancing steam exposure to soften the adhesive thoroughly without saturating the plaster below. Excess moisture can cause plaster to swell or crumble, creating even more work during repairs. Moving slowly, work in sections, and always test a small area first to gauge how your walls react. In Winnipeg homes where older plaster may already show signs of wear, take extra care to avoid damaging delicate surfaces. The combination of hot steam, proper technique, and regular safety checks ensures efficient wallpaper removal while protecting your walls.
Addressing Common Wall Issues Post-Removal
Repairing Flaky Paint and Surface Imperfections
Flaky paint patches often peel away with old Wallpaper, leaving uneven surfaces that can disrupt your new finish. Start by scraping off loose paint with a wallpaper scraper, then smooth the edges using a hand sander or sandpaper. Applying a thin layer of Polycell Finishing Skim with a paintbrush fills minor dents and creates a uniform texture. Once dry, sanding back the compound ensures a perfectly flat surface, ready for painting or fresh Wallpaper, delivering that professional look every Winnipeg homeowner wants.
Handling Deeper Plaster Damage
For deeper holes and gouges, Polycell Pollyfiller suits small repairs, while Polycell Plaster Repair handles larger damaged areas. Clear out any loose debris from the hole before applying the lightweight filler with the provided spatula. Post-drying, sanding it smooth blends seamlessly into the wall. This technique restores your plaster walls’ integrity, setting the stage for flawless decoration without unsightly cracks or dips.
Deeper plaster damage often requires more attention to detail – after cleaning the damaged area thoroughly, pressing in the filler firmly avoids air pockets and ensures stronger adhesion. For extensive patches, layering the Plaster Repair product in thin coats prevents cracking as it dries, improving long-term durability. Using this method, many Winnipeg homes regain smooth wall surfaces that hold paint or Wallpaper beautifully, resisting future damage caused by the original wallpaper removal process.
Eliminating Residual Wallpaper Paste
Sanding remaining Wallpaper paste with a hand sander or fine sandpaper helps reduce adhesive buildup, but glossy or stubborn residues often resist removal. Applying a primer like Zinsser Gardz seals these sticky areas, preventing old glue from bleeding through fresh paint and leaving uneven texture or shine. Washing your walls with Sugar Soap beforehand removes dust and loose debris, creating a clean, sealed surface ready for your new room design.
Zinsser Gardz excels by forming an invisible moisture barrier that locks in adhesive residues beneath your paint. This milky primer can be applied with either a brush or roller and dries quickly to a smooth, matte finish. For homeowners in Winnipeg, using Gardz effectively prevents patchy discoloration or peeling down the line, making it an important step for any wallpaper removal project that uncovers residual paste.
Expert Tips for a Flawless Finish
- Thorough surface preparation ensures your new paint or Wallpaper adheres perfectly without imperfections.
- Use appropriate protective gear like gloves, goggles, and masks, especially when handling chemical strippers or steamers.
- Light scoring of Wallpaper allows stripping agents to penetrate without damaging your plaster walls.
- Avoid oversteaming to prevent plaster damage and maintain wall integrity.
- Sand and patch carefully, smoothing out flaky paint and plaster patches before priming.
- Seal leftover adhesive residues with a specialized primer like Zinsser Gardz to avoid paint blemishes.
The Importance of Preparation Before Painting
Preparation lays the groundwork for a smooth, professional finish. After stripping Wallpaper and addressing flaky paint or plaster, sanding the walls removes uneven textures and leftover adhesive. Cleaning with a mild detergent or sugar soap clears dust and grime that could prevent paint adhesion. Proper surface prep drastically reduces bubbling, peeling, or uneven paint in Winnipeg’s variable climate, setting you up for success with your repainting project.
Recommended Products for Optimal Results
Choosing the right products can make all the difference when stripping Wallpaper and prepping walls. Chemical strippers like Zinsser DIF effectively break down stubborn paper and paste. For smoothing minor imperfections, Polycell Finishing Skim offers a lightweight, easy-to-sand formula ideal for flaky paint spots, while Polycell Pollyfiller or Plaster Repair quickly restores deeper holes. Sealers such as Zinsser Gardz prevent glue residue from bleeding through fresh paint, ensuring a uniform surface.
For Winnipeg homes that often undergo fluctuations in humidity and temperature, products designed for durability and easy application are imperative. Zinsser DIF concentrated stripper speeds up removal without aggressive wall damage, which works well when handling older or multi-layered Wallpaper. Polycell’s range adapts to both small and extensive plaster repairs, offering a convenient plastic spatula and fast drying times suited to DIY timelines. Finally, Zinsser Gardz acts as a superior barrier, stopping sticky paste residues from causing unsightly paint blemishes or texture inconsistencies. By integrating these trusted products into your process, you confidently achieve a smooth, long-lasting finish that enhances your home’s appearance and withstands Winnipeg’s climate challenges.
Repairing Walls Post-Wallpaper Removal
Addressing Flaky Paint and Surface Imperfections
Flaky paint patches often appear where the Wallpaper has peeled off, revealing uneven surfaces that can spoil your new finish. Start by scraping away any loose paint with a wallpaper scraper, then use a hand sander or sandpaper to smooth the edges. Applying a thin layer of a finishing skim, like Polycell Finishing Skim, helps to level out small imperfections. Once dry, sanding it back will give you a smooth, even base ready for your next coat of paint or Wallpaper.
Filling and Smoothing Deeper Holes
For larger holes or damaged plaster, smaller gaps can be treated with a patching filler such as Polycell Pollyfiller, while more extensive damage calls for a product like Polycell Plaster Repair. Remove all loose debris from the damaged area before applying the repair compound with a plastic spatula. After drying, sanding the surface smooth will ensure a flawless finish that blends seamlessly with the rest of your wall.
Diving deeper, Polycell Plaster Repair is a lightweight and easy-to-work-with mixture ideal for extensive wall repairs common in older Winnipeg homes. It adheres well without shrinking and can be applied in layers for deeper damage. Using the accompanying plastic spatula, pressing firmly to fill gaps fully helps avoid air pockets that might crack later. As you sand back the dried compound, aim to feather the edges to blend the repair into adjacent surfaces, which prevents any telltale patches when painting. Tackling these damaged spots properly will save you from future bubbling or peeling, making sure your freshly redecorated walls stay pristine.
When DIY Becomes Overwhelming
Understanding When to Call in the Professionals
Sometimes, the stubbornness of old Wallpaper and the fragility of plaster in Winnipeg homes can turn a straightforward DIY task into a daunting challenge. If stripping Wallpaper leads to plaster damage, mold risks, or excessive time spent without progress, it may be wise to contact experienced painters who specialize in interior surface preparation. Professionals bring the right tools, such as industrial steamers and specialized fillers, plus the know-how to protect your walls and ensure a smooth base, saving you frustration and costly repairs down the line.
Exploring Alternatives: Painting Over Wallpaper
When wallpaper removal feels like an uphill battle, painting over it can offer a practical solution. By using a product like Zinsser Wallpaper Cover-Up, you can block old patterns and seal seams, creating a more uniform surface ready for paint. Although this method won’t replicate the flawless finish of fully stripped walls, it’s a time-efficient and less labor-intensive alternative that suits many renovation projects in Winnipeg homes.
Painting over Wallpaper requires proper preparation: cleaning the walls, repairing any peeling edges, and applying a specialized primer that prevents adhesives and prints from bleeding through. This approach works best on relatively flat, intact Wallpaper and can be combined with a fresh coat of matte paint for a modern, refreshed look. Keep in mind that wallpaper texture will remain slightly visible, so opting for a subtle paint color helps mask imperfections and achieve a pleasing finish without the mess of full removal.
Alternatives to Full Wallpaper Removal
Painting Over Wallpaper: Is It Worth It?
Choosing to paint over Wallpaper can save significant time and effort, especially if the Wallpaper is firmly attached and in good condition. Although this method won’t provide the perfectly smooth finish achieved by full removal, using special primers can help block patterns and prevent adhesive stains. For Winnipeg homes where quick updates are needed, painting over Wallpaper offers a practical compromise. However, be aware that textured or peeling Wallpaper can affect the durability and appearance of the new paint. Preparation still plays a key role in ensuring acceptable results.
Utilizing Wallpaper Cover-Up Methods
Zinsser Wallpaper Cover-Up is a popular solution when you want to paint directly over Wallpaper without stripping it first. This product acts as a sealing primer that blocks out old patterns and smooths over textured surfaces, creating a solid base for your paint. Applying Cover-Up properly minimizes the risk of prints showing through or paint peeling later on, making it a valuable tool for homeowners facing stubborn Wallpaper in Winnipeg’s varying climate conditions.
Applying Zinsser Wallpaper Cover-Up involves first cleaning the wall to remove dust and grease, then rolling or brushing on a generous coat of the primer. The product fills in seams and hides minor imperfections so your paint applies evenly. Coverage rates usually allow one gallon to treat about 250 square feet, making it cost-effective for medium-sized rooms. For best longevity, use Cover-Up in well-ventilated areas and follow up with good quality interior paint. This method doesn’t address the wallpaper adhesive underneath, so it works best when the Wallpaper is firmly bonded and your goal is a smooth, clean finish without the hassle of full removal.
Eliminating Residual Wallpaper Adhesive
Sanding Techniques for a Clean Surface
After stripping the Wallpaper, tackling those stubborn flecks of residue paste will set you up for a flawless finish. Use a hand sander or fine-grit sandpaper to gently abrade the leftover adhesive, smoothing out any shiny or tacky patches. Focus on even pressure to avoid gouging the plaster. This simple step removes most of the old glue and creates a receptive surface for your primer, ensuring your new paint doesn’t bubble or peel once applied.
Best Practices for Priming Over Old Paste
If sanding hasn’t fully cleared off that glossy, persistent wallpaper paste, applying a specialist primer will seal the surface and prevent the adhesive from bleeding through your paint. Products like Zinsser Gardz act as excellent sealers, forming a thin, protective barrier that blocks residue shine and texture. Apply evenly with a brush or roller and allow it to dry thoroughly before moving to paint or Wallpaper.
Using Zinsser Gardz has become a go-to step in Winnipeg homes during renovation for anyone dealing with the common problem of residual paste. It not only seals in old glue but also stabilizes any remaining loose particles that sanding can’t fully remove. This primer transforms tricky surfaces into stable foundations, making sure your fresh paintwork adheres properly and looks smooth without unsightly marks or glossy patches seeping through. Applying Gardz right after thorough sanding and washing with Sugar Soap will give you the best chance of achieving a professional-quality finish that lasts.
Expert Tips for a Flawless Finish
- Score wallpaper lightly with a Paper Tiger or scraper to allow stripping agents to penetrate without damaging plaster beneath.
- Use protective gear such as gloves, glasses, and a respiratory mask when handling chemical strippers or steamers to avoid irritation or burns.
- Avoid oversteaming to prevent weakening plaster and risking wall damage during removal.
- Sand the residue gently to remove stubborn paste and prepare the surface for sealing or painting.
- Fill holes with the right compound—Polycell Finishing Skim for minor flaky paint issues or Polycell Plaster Repair for larger plaster damage.
- Apply prime seals like Zinsser Gardz to stop adhesive residues from bleeding through fresh paint coats.
Preparing Walls for Painting or New Wallpaper
Once your walls are stripped, sanding down any remaining residue and smoothing out patched areas ensures a seamless surface. After thorough cleaning with sugar soap to remove dust and grease, your walls will be ready for either paint or fresh Wallpaper. Tackling imperfections now prevents visible flaws later, giving you a truly professional finish tailored to Winnipeg’s climate conditions.
Choosing the Right Primer and Sealants
Select primers designed to lock in old adhesive and prevent bleed-through, like Zinsser Gardz. These sealants not only stop shiny glue residues from showing through but also create a durable base that helps paint or Wallpaper adhere better. Using a quality primer tailored to your project ensures longevity and a crisp final appearance.
Zinsser Gardz is particularly effective where glossy wallpaper paste lingers after removal. This thin, milky sealant forms a barrier that neutralizes sticky residues, so new paint stays vibrant and smooth without unsightly marks. You might apply it with a roller for larger walls or a brush for corners and edges. In Winnipeg’s fluctuating humidity, sealing properly guards against peeling or bubbling, making your renovation withstand local environmental stresses. Recognizing the importance of priming as part of your preparation elevates your project outcome significantly.
Final Words
Taking this into account, successfully removing Wallpaper without damaging your walls in Winnipeg requires patience, the right tools, and proper technique. You should test the Wallpaper’s adhesion first and choose between liquid strippers or steamers accordingly to avoid harm to your plaster. Scoring the paper gently and protecting your surfaces will make the process smoother. After removal, addressing any imperfections with appropriate fillers and primers ensures a flawless base for repainting or new Wallpaper. If you need expert assistance, Lakeside Painters in Winnipeg can guide you through achieving perfect wall preparation with professional care.
Exploring Alternatives: Painting Over Wallpaper
Pros and Cons of Painting on Existing Wallpaper
Painting directly over Wallpaper can save time and effort, but this shortcut comes with trade-offs. Below is a breakdown of the main benefits and drawbacks to help you decide if this method suits your Winnipeg home renovation.
| Advantages | Disadvantages |
|---|---|
| Eliminates the need for removal, saving time | Wallpaper texture and seams may show through the paint |
| Less dust and mess compared to stripping | Paint adhesion can be unreliable on some wallpapers |
| Cost-effective by avoiding expensive stripping materials | Can trap moisture, increasing the risk of mold or damage |
| Good option for temporary fixes or rentals | Surface may peel if the Wallpaper wasn’t originally well-adhered |
| Special primers like Zinsser Wallpaper Cover-Up block patterns | Unlikely to achieve a fully smooth, professional finish |
Preparing Wallpaper for a Fresh Coat of Paint
Start by cleaning the wallpaper surface thoroughly with warm water and a mild detergent to remove dust and dirt. Next, lightly sand any glossy or textured wallpaper to create a key for primer adhesion. Applying a high-quality bonding primer specifically designed for Wallpaper seals the surface and promotes paint longevity. Avoid heavy sanding that might damage the wallpaper backing; a gentle approach preserves integrity while prepping it for paint.
It helps to patch any peeling edges or bubbles using wallpaper adhesive before priming. This prevents further lifting after painting. When working in Winnipeg’s humid climate, ensure walls are completely dry to minimize moisture issues beneath painted Wallpaper. Although painting over Wallpaper can cut down on labor, meticulous surface prep remains vital to extend the life of your new finish and keep walls looking crisp and clean longer.
FAQ
Q: What is the best method to remove Wallpaper in Winnipeg homes without damaging the walls?
A: In Winnipeg homes, the gentlest and most effective method to remove Wallpaper without harming the walls is to first test how firmly the Wallpaper is attached. If the Wallpaper comes off easily by hand in large strips, using a wallpaper scraper combined with a gentle liquid wallpaper stripper is recommended. For tougher Wallpaper, using a wallpaper steamer helps loosen the adhesive without excessive scraping. Always lightly score the Wallpaper before applying any liquid stripper to allow it to penetrate without cutting into the wall plaster. These methods help maintain the integrity of the underlying surface, making it ready for repainting or new wallpaper installation.
Q: How can I prepare my walls in Winnipeg for repainting after removing Wallpaper?
A: After wallpaper removal, walls may have leftover adhesive, damaged plaster, or flaky paint patches. In Winnipeg’s climate, ensuring walls are smooth and properly sealed will improve paint adherence. Use a hand sander to smooth out residue and flaky areas, and apply patching compounds like Polycell Finishing Skim or plaster repair products on deeper holes. For sticky wallpaper paste residues, applying a primer such as Zinsser Gardz creates a protective barrier so paint doesn’t soak unevenly or peel. Washing the walls with a sugar soap solution before priming helps eliminate dust and grit for a flawless finish.
Q: Are there ways to avoid removing Wallpaper and still achieve a good paint finish in Winnipeg homes?
A: Yes, if removing Wallpaper feels too labor-intensive, Winnipeg homeowners can paint directly over Wallpaper by first applying a product like Zinsser Wallpaper Cover-Up. This type of primer fills lines, blocks patterns, and seals wallpaper prints so that paint goes on with a smooth, even finish. While it won’t provide the exact smoothness of freshly plastered walls, it offers a cost-effective and less time-consuming option for updating a room’s look without the mess of wallpaper removal.
Final Thoughts on a Smooth Transition
Embracing Patience and Precision
Wallpaper removal rarely fits a neat timeline. Even with an efficient setup, expect to invest several hours—sometimes days—depending on the age and condition of your Wallpaper in your Winnipeg home. Tackling stubborn adhesive or deep-set layers without rushing helps avoid unnecessary damage to your plaster. For example, I found that scoring the Wallpaper lightly before applying stripper made a significant difference in allowing the solution to penetrate thoroughly, reducing scraping time.
Choosing the Right Tools for Your Space
Basic scraper tools paired with a quality liquid wallpaper stripper often suffice for easily removable paper, especially in Winnipeg’s dry climate, where moisture won’t linger excessively. However, where wallpaper clings stubbornly, a steamer can be a game-changer. Be cautious: oversaturation risks weakening plaster, a lesson learned firsthand when a steam session loosened some wall areas needing re-plastering with Polycell Plaster Repair. For tight spots behind radiators or corners, a long-handled scraper saved the day, preventing awkward contortions and ensuring a consistent peel.
Surface Preparation Drives the Next Steps
Once the peeling ends, your focus shifts to smoothing out imperfections. Dealing with flaky paint patches and uneven plaster requires more than cosmetic touch-ups. Applying Polycell Finishing Skim to shallow blemishes left by old paint layers creates a refined base. At the same time, deeper gouges call for the robust filling power of Polycell Pollyfiller or Plaster Repair. The hand-sanding process here is key: achieving a consistent feathered edge means your subsequent primer and paint layers will lie flawlessly.
Sealers and Primers as Final Barriers
In Winnipeg’s variable humidity, residue paste lingering after sanding can cause unexpected paint imperfections. Applying a product like Zinsser Gardz builds a protective seal that blocks glue from bleeding through. After washing with Sugar Soap to remove sanding dust, this step ensures the new paint or Wallpaper adheres properly and that your chosen colors remain vibrant and even. Skipping this could lead to unsightly shine or texture inconsistencies, especially with glossy residues.
Balancing Effort with Outcome in Winnipeg Homes
Though the process demands patience, your result speaks for itself. A Winnipeg homeowner I worked with opted to paint directly over Wallpaper using Zinsser Wallpaper Cover-Up due to time constraints. While this avoided full removal, the texture showed through slightly, reinforcing that fully stripping Wallpaper and addressing wall issues ahead of painting grants a much smoother, professional finish. Investing time in preparation means fewer touch-ups down the line and a longer-lasting, attractive wall surface.
Your walls serve as the foundation for your décor; the more thorough your wallpaper removal and surface preparation, the more rewarding the transformation. Approaching the task methodically ensures that your fresh paint or new Wallpaper brings life to your Winnipeg home exactly as envisioned.
Expert Insights and Common Pitfalls in Wallpaper Removal
Lessons Learned from DIY Experiences
Your patience will pay off, especially when you tackle stubborn wallpaper spots by scoring gently before applying stripper. Many DIYers find that investing in a long-handled scraper and a quality wallpaper stripper like Zinsser DIF saves both time and frustration. Expect to work in stages—large chunks often peel off easily, but the edges and corners need extra care. Wearing goggles and gloves proved vital to avoid irritation from chemical strippers, and integrating sanding and patching steps after removal makes all the difference in achieving a smooth finish ready for painting or new Wallpaper.
Avoiding Mistakes for a Damage-Free Finish
Oversteaming walls with a wallpaper steamer is one of the most common errors that leads to plaster damage. Applying too much pressure with scraping tools or cutting too deep when scoring the Wallpaper also increases the risk of gouges. Using products like a Paper Tiger to score Wallpaper without harming the underlying plaster can prevent accidental wall damage. Prepping your work area with floor protection and having rags ready for excess stripper keeps the space tidy and reduces slip hazards.
One effective way to minimize damage involves balancing each step carefully. For instance, score the wallpaper surface lightly to allow stripping fluids to penetrate, but avoid pressing too deeply, which can weaken plaster integrity. When using a steamer, limit steam exposure time on any one spot to prevent moisture buildup that weakens wall material. Following manufacturer guidelines for chemical strippers and carefully sanding flaky paint or residual paste afterward creates a stable base. If leftover adhesive or glossy paste remains, applying a primer like Zinsser Gardz blocks stains and prevents uneven paint texture. By combining gentle mechanical methods with appropriate chemical treatments, you safeguard your walls and set yourself up for flawless, long-lasting finishes in your Winnipeg home.
Final Words
Ultimately, removing Wallpaper without damaging your walls in Winnipeg requires patience, the right tools, and proper technique. By testing the Wallpaper’s adhesion, using gentle scoring, applying liquid strippers or steam where needed, and carefully addressing any residue or wall damage, you ensure a smooth surface ready for your next project. Taking these steps protects your walls and helps achieve a flawless finish. If you want expert assistance tailored to Winnipeg homes, Lakeside Painters is here to help make your renovation seamless and stress-free.